This is the multi-page printable view of this section. Click here to print.

Return to the regular view of this page.

VirtualSpace

What is the IIZI VirtualSpace?

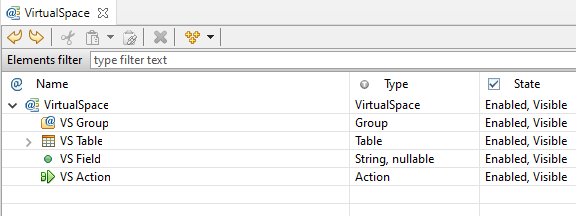
You can create a main VirtualSpace for your application or use the VirtualSpace provided from the IIZI Quickstart project. The main VirtualSpace will allow you to create flexible code by directly referencing VirtualSpace Tables, Fields, Groups and Actions. These virtual entities carry all the data required, consequently, they will trigger and respond to client interaction, device states and events. The VirtualSpace of your project allows multi-directional data binding throughout your application.

VirtualSpace and its four component types

1 - Actions

VirtualSpace actions

Action editor for vsAction

The Action Editor panel is used to define actions and how the Action Actors – these are nodes in the IIZI transaction framework (TXP) – are to be ordered and which ones to use or connect to. This definition makes up the TXP process. See section Java class and method connections.

VirtualSpace and its four component types

For simple actions requiring just Java code, you can use the OnVSAction method when you have specified a Java class that is attached to the namespace, e.g. the namespace is called start and the vsAction my-Action is connected to the method onAction as:


    package mypkg;

    import com.iizix.api.vs.OnVSAction;
    import com.iizix.api.vs.VSActionEvent;
    import com.iizix.api.vs.VirtualSpace;

    @VirtualSpace(ref = "FirstProject:/vs/start")
    public class StartNameSpaceListener {

        @OnVSAction(name = "my-Action")
        public void onAction(VSActionEvent event) {
            // Code here...
        }
    }

Use the more button to drop-down a menu to help you create the method. When you rename the VS Action, it will update you Java source code (name= “newName”), and if you refactor the method name using Java Refactoring, the OnVSAction definition will be set to the new name.

The Execution can also be specified to set a Timeout for the TXP process, and in the Thread choice defines in what thread it should execute in. The UI may be locked immediately when the action begins with Lock UI and when it ends using Unlock UI. If the UI is locked, it must be unlocked somehow; otherwise the client will keep on displaying an “hourglass”. This does not have to be when the action ends: it is up to you when and how to do it (the AppSessionGyro contains methods for the UI lock state).

Action Actors

The Action Actors are defined for a VS Action to make up the TXP process. Each actor is a TXP node, and the ordering is important. The process either completes successfully or rolls back. A failure to complete the process is logged in the server application log as well as to present the error in the UI.

The action actors that can be added are the ones you have created in the various data connectors, a special Java actor and the predefined actors:

Predefined actorDescription
SetFocusSet focus
SetSourceFieldValueSet source field value
SetTargetFieldValueSet target field value
TransportFieldTransports a field
TransportGroupTransports a group of components
TransportSelectedTableRowsTransport selected table rows
TransportSingleSelectedTableRowTransport single-selected table row
TransportSingleSelectedTableRow-AndColumnToFieldTransport single-selected table row and colum to field
TransportSingleSelectedTableRowToFieldsTransport single-selected table row to fields
TransportTableColumnTransport table column
TransportTableRowsTransport table rows

Each actor can provide (and generally do provide) editable properties that needs to be filled in.

The VS Action has a property Target namespace that is used for the transport operations and the SetTargetFieldValue operation.

Java Action Actor

This actor is used when the Java code needs to execute in the TXP process as a node, i.e. it can handle commit and rollback, etc. The actor is a class that must extend

com.iizix.actionactor.AbstractJavaActionActor

/**
 * The Java Action Actor that takes a String parameter
 * and a LocalTime Value for show.
 */
@JavaActionActor(descr = "A simple Java Actor without rollback",
                 modifiesVS = false,
                 ref = "FirstProject:/vs/start/my-Action")

@JavaActorParam(name = "myString", prompt = "myString for show",
                type = JavaActorParam.Type.String)

@JavaActorParam(name = "myTime", prompt = "myTime for show",
                type = JavaActorParam.Type.Value_LocalTime,
                defaultInput = "00:00")

public class MyActor extends AbstractJavaActionActor {
    /**
     * Called when the TXP executes this Action Actor node.
     */
    @Override
    public void onAction(VSActionTXProcess process) {
        // Place your code here...
    }
}

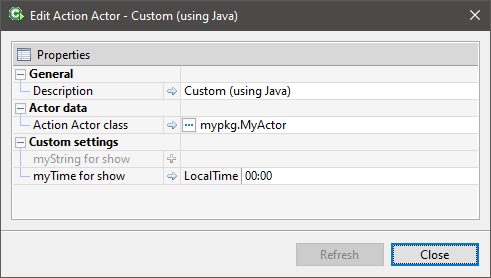
The class above is an action actor that is connected to the my-Action VS Action, and prompts the developer to fill in two parameters myParam as a String and myTime as a ValueProp of the type LocalTime with a default value of 00:00. The dialog box presented to the developer looks like:

The feature of making it possible to store parameters for an individual Java Action Actor is very useful as it allows a class to be re-used in various places where the parameters can be used to set the context for the class instance. See the JavaDoc of the @JavaActorParam for additional annotation parameters such as allowNull, tooltip, etc.

The Refresh button in the dialog may be used if the parameters do not match the class if you change the class name. Pressing Refresh will reload the class annotations and refresh the properties displayed.
2 - Connections

VirtualSpace connections
Connect a panel to VirtualSpace from the property editor.

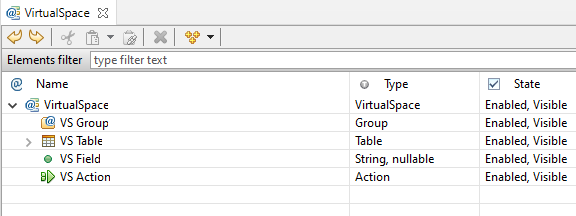
Whether you have started working on your new iiziApp through the UI, data-source or Java code, you have already made some connections to a VirtualSpace. It is recommended that you create the four possible VirtualSpace entities inside of vsGroups; these entities can then be updated and controlled individually or simultaneously by updating the vsGroup. This means that the VirtualSpace is likely to be a representation of the data model at a specific application instance.

To connect the UI components to VirtualSpace entities, the Panel must first be connected to a VirtualSpace. In this way, you will connect UI components that handle data to a VirtualSpace entity. UI components which handle actions, such as buttons, are likely to have a vsAction property.

  • Click the more button in the value field of the VirtualSpace property of the Panel.
Connect a panel to VirtualSpace from the property editor.
  • Select to connect to a VirtualSpace by either creating one or selecting a VirtualSpace.

  • Create a vsField in the VirtualSpace Editor.

Connect a component to a VirtualSpace entity from the property editor.
  • Connect the component to the vsField.

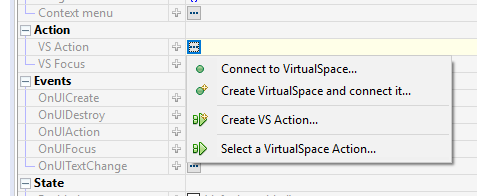
  • Click the more menu in the value field of the vsAction property to create a vsAction or connect to an already existing.

The vsAction property under Actions in a button component’s properties.

The VirtualSpace supports drag and drop of itself and its components using the Link operation. You can create a connection between the drag-dropped elements and the destination; the destination can be a Panel or its components, a Data Connector or its data input or output.

3 - Editor and tools

VirtualSpace editor and tools

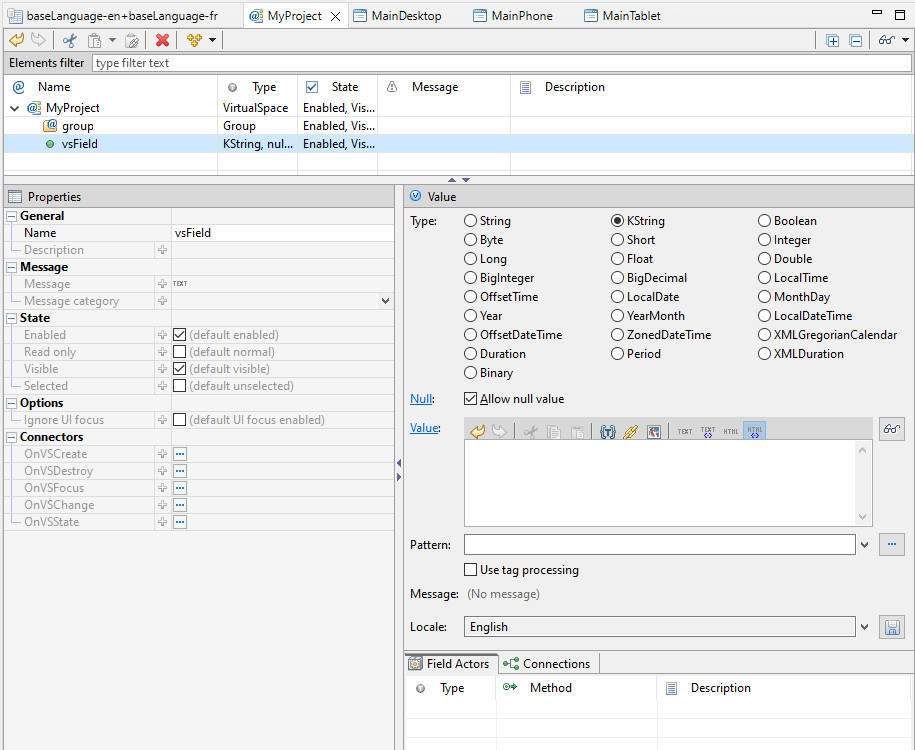
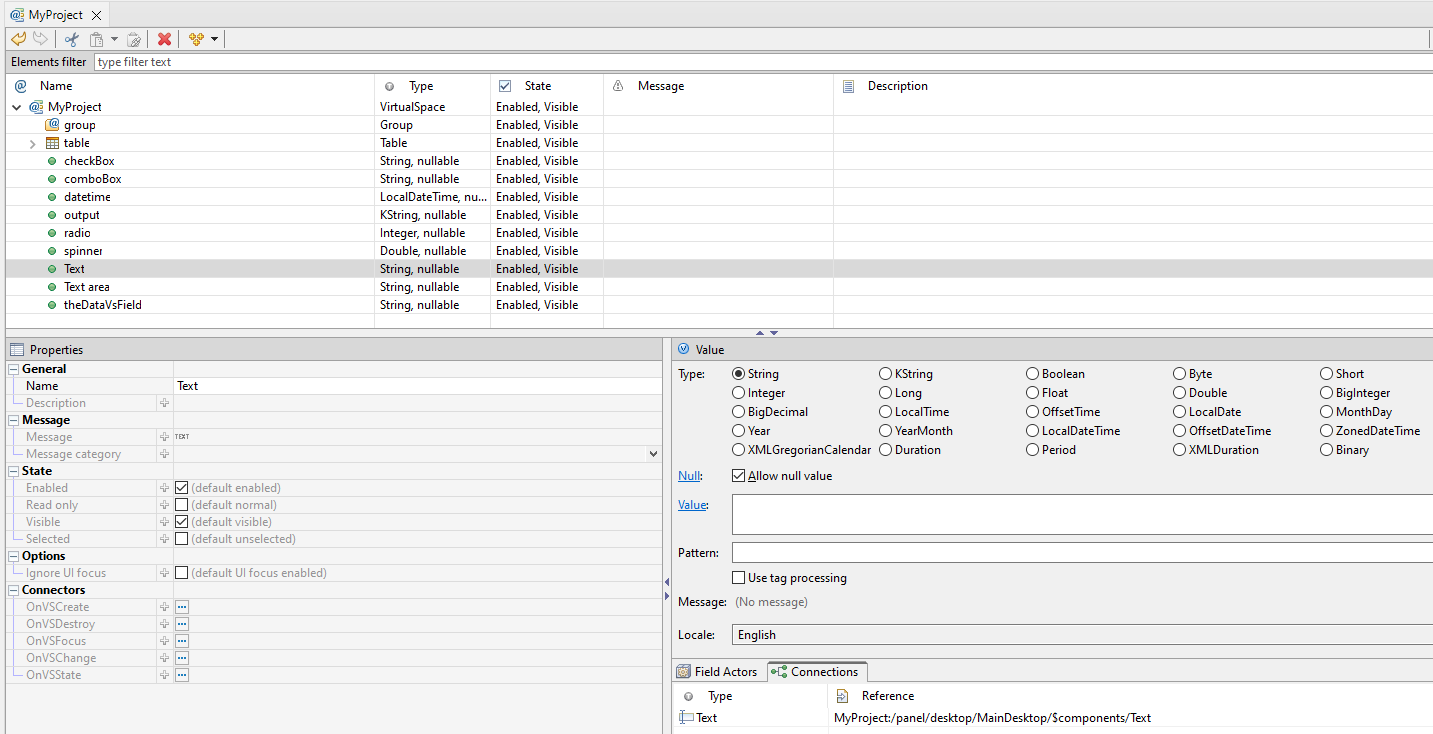
The properties shown in the VirtualSpace Editor depend on the selected VirtualSpace entity type – all VirtualSpace entities have the states Enabled, Read-only, Visible and Selected. By default, they are all Enabled and Visible, not Read-only and not Selected. The value of each VirtualSpace entities can be changed depending on the type of data in the editing pane at the bottom right – specialized for each component.

The VirtualSpace Editor

Edit values for VirtualSpace entities

  • The vsField has a Value editor that better shows all the value settings:
  • Type: the datatype of the value,
  • Null: if the value is Nullable or not (clicking on Null hyperlink will set the value to null),
  • Value: entry field to enter the value in a string that can be parsed by the value type in question without pattern, e.g. 0 for a Double, P2DT3H4M for a Duration of 2 days, 3 hours and 4 minutes, 12:45:56 for a LocalTime value,
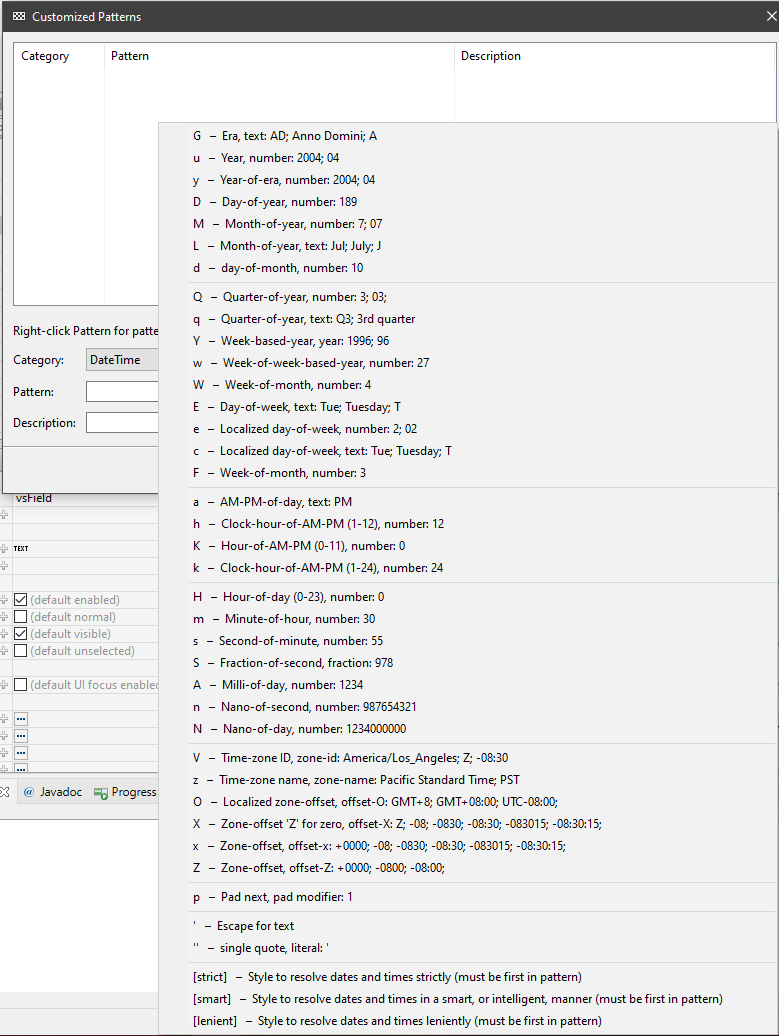
  • Pattern: the pattern to use for the formatter of the value type, e.g. #,##0.00;(#,##0.00) for a number with 2 decimals displayed as (123.45) when negative, hh’o”clock’ a, zzzz for a date as 12 o’clock PM, Pacific Daylight Time,
  • Use tag processing: use this option to enable the plain string entered as pattern to accept tags to reference a text table for special localized patterns depending on the language used for the client session.
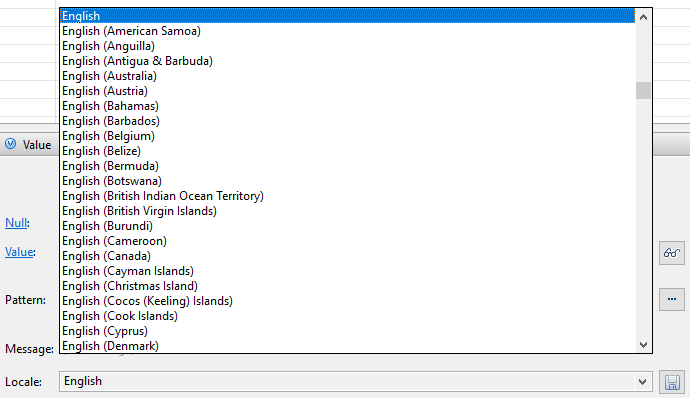
  • Locale: combobox used for testing purposes to see how a value would look like in a specific locale. The tooltip of the Value entry field shows a preview of the value with the pattern in the specified locale; you can also toggle the preview to always be shown.

4 - Field Actors

VirtualSpace field actors

The Field Actors are used for three purposes: conversion to a Value from a native value, conversion from a Value to a native value, and validation. They are written in a Java class and are intended to be re-used in many parts of the application as required. The native value is the value used for the conversion, generally String or KString, but supports any Java Object. The validation is done on the Value itself (i.e. has already passed the conversion stage to a Value).

The VSFieldEvent parameter has access methods to what you need to perform the task, and is also used to set a validation message for conversion or validation failures.

The actor is an instance method of a name of your choice, annotated by @OnVSField in the class that is attached to the namespace, or it can be a static class located in Java libraries (Jar files) or other Java projects annotated with @OnVSFieldStatic.

Example of namespace class instance:

package mypkg;

import com.iizix.api.vs.OnVSField;
import com.iizix.api.vs.VSFieldEvent;
import com.iizix.api.vs.VSFieldEvent.Category;
import com.iizix.api.vs.VSFieldEvent.Op;
import com.iizix.api.vs.VirtualSpace;
import com.iizix.text.KString;

/**
 * JavaDoc shown in tooltips when hovering mouse over the class reference.
 */
@VirtualSpace(ref = "FirstProject:/vs/start")
public class StartNameSpaceListener {

    /**
     * This JavaDoc is shown in when hovering mouse over a method reference.
     * 
     * @param event
     *            The VS Field event.
     */
    @OnVSField(name = "fld", descr = "MyFieldActor ABC 123", ops = { Op.VALIDATE },
               source = { String.class })
    public void onField(VSFieldEvent event) {
        Object value = event.getConvertedValue();
        if (value instanceof String) {
            // Do your validation.
            String s = (String) value;
            if (s.equals("123")) {
                event.setMessage(
                        KString.newPlainKString("123 is not a valid value"),
                        Category.WARNING);
            }
        }
    }
}

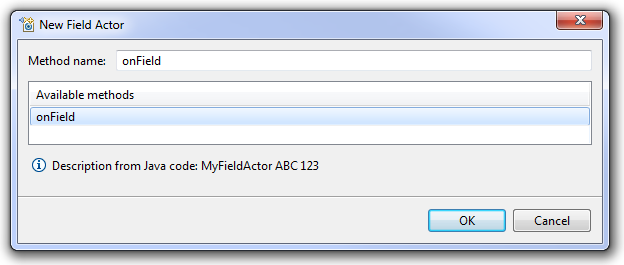
In the context menu of the field actors, select New Field Actor, then the dialog box will list all available methods from the namespace attached class, and those that would match that are on the project’s classpath (including static methods in libraries and other projects):

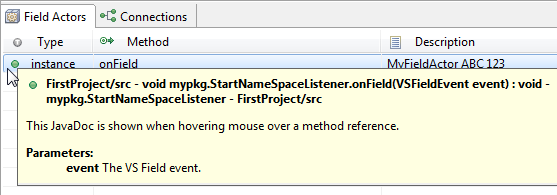
When you select a method in the list, its description taken from the descr = "string" of the method annotation. When you close the dialog box, the tooltip of the field actor could look like:

5 - How VS works?

How VirtualSpace works?
  1. How VirtualSpace works? (Same VS)

  2. How VirtualSpace works? (Separate VS)

  3. How to change the app default VirtualSpace Focus?

  4. How VirtualSpace works with multiple devices?


How VirtualSpace works? (Same VS)

There is a tutorial video just down below.

  • You need a QuickStart project:

    • Select File > New > IIZI Module Project (Quickstart)
    • Enter project name and unselect Create text tables with automatic translation
    • Press Finish
       
  • Right-click to desktop package in Panels

    • Select New > Panel…
    • Set a name > Then select Next
    • Select your panel type and your initial layout
    • Then select Next
    • Select your user interface type and your theme here
    • Then click on Finish
       
  • Go to your VirtualSpace

    • Add VS Group
    • Try to use same name as your panel
       
  • Go back to your Panel’s properties

    • Click on State & focus > Connect to VirtualSpace…
    • Select your VirtualSpace > Then click OK
    • Click again on State & focus > Select VS Component…
    • Select your VS Group > Then click OK
    • OPTIONNAL: You can add new label to this panel.
       
  • Go back to your MainDesktop panel

    • Add button and go to button properties:
      • Add your panel name in Text
      • Click on VS Focus
      • Select VS Component reference to focus…
      • Select VS Group of your new panel
         
  • Then do File > Save All or CTRL + SHIFT + S

    • Right click on project name > Run As > Run on IIZI Development Server
    • If it says “No configured IIZI Development Server configuration is found”: Choose Yes.
    • Right click on IIZI Development Server > New Configuration > Add a Configuration Name > Run it
       
  • To test it:

    • You need to open your browser and go to: http://localhost:8080/
    • Click on the link: here
    • Then click on Start to launch the app in the browser.
    • You just click on the button and it will go to your new panel.
       

How VirtualSpace works? (Separate VS)

There is a tutorial video just down below.

  • You need a QuickStart project:

    • Select File > New > IIZI Module Project (Quickstart)
    • Enter project name and unselect Create text tables with automatic translation
    • Press Finish
       
  • Right-click to desktop package in Panels

    • Select New > Panel...
    • Set a name > Then select Next
    • Select your panel type and your initial layout
    • Then select Next
    • Select your user interface type and your theme here
    • Then click on Finish
       
  • Go to your Panel's properties

    • Select VirtualSpace > Create new VirtualSpace...
    • Set a name > Then select Finish
       
  • Go to your new VirtualSpace

    • Add VS Group
    • Try to use same name as your panel
       
  • Go back to your Panel's properties

    • Click on State & focus > Select VS Component...
    • Select your VS Group > Then click OK
    • OPTIONNAL: You can add new label to this panel.
       
  • Go back to your MainDesktop panel

    • Add button and go to button properties:
      • Add your panel name in Text
      • Click on VS Action
      • Select Create VS Action...
      • Set a name > Then select Finish
      • Double-click on VS Action's propertie
         
  • Click on Target VirtualSpace

    • Then Select VirtualSpace...
    • Choose the other VirtualSpace
       
  • In the Action definition part:

    • Select Action Actors
    • Right click > Add > Set focus
    • Click on the Target focus
    • Then Select VS components reference to focus...
    • Choose the VS Group you want
    • Then do File > Save All or CTRL + SHIFT + S
    • Right-click on project name > Run As > Run on IIZI Development Server
    • If it says “No configured IIZI Development Server configuration is found”: Choose Yes.
    • Right click on IIZI Development Server > New Configuration > Add a Configuration Name > Run it
       
  • To test it:

    • You need to open your browser and go to: http://localhost:8080/
    • Click on the link: here
    • Then click on Start to launch the app in the browser.
    • You just click on the button and it will go to your new panel.
       

How to change the app default VirtualSpace Focus?

There is a tutorial video just down below.

  • You need a QuickStart project:

    • Select File > New > IIZI Module Project (Quickstart)
    • Enter project name and unselect Create text tables with automatic translation
    • Press Finish
       
  • Right click on your project name

  • Select Properties

    • Go to IIZI then App
    • On Startup > Focus then click ...
    • Click on Select VS component reference to focus...
    • Choose the VS Group you want to set as default
    • Then click OK
    • Finally click on Apply and Close

How VirtualSpace works with multiple devices?

There is a demo video to show you how VirtualSpace is works with multiple devices connected.

6 - Table editor

VirtualSpace table editor for the vsTable entity

The vsTable is special among the VirtualSpace entities and should be used to connect data tables, lists and other collections. The Table editor pane shows the table columns and rows:

The VirtualSpace vsTable editor and toolbar. All tools available to manipulate rows and columns are in the toolbar or in the context menu. Columns are drag-drop movable using their headings to reorder columns; you can also reorder multiple columns from the VirtualSpace Editor tree-table. Rows and columns can also be moved with the arrow tools. Double-click on a cell to edit its value.

When a column is selected, the Column Field Actors are displayed and can be edited. These actors provide the same functionality as the Field Actors, but are the definition of the column that is applied to all its cells (fields). The entry fields just above the table are used for, one filter per column, and the rows shown must match all defined filters.